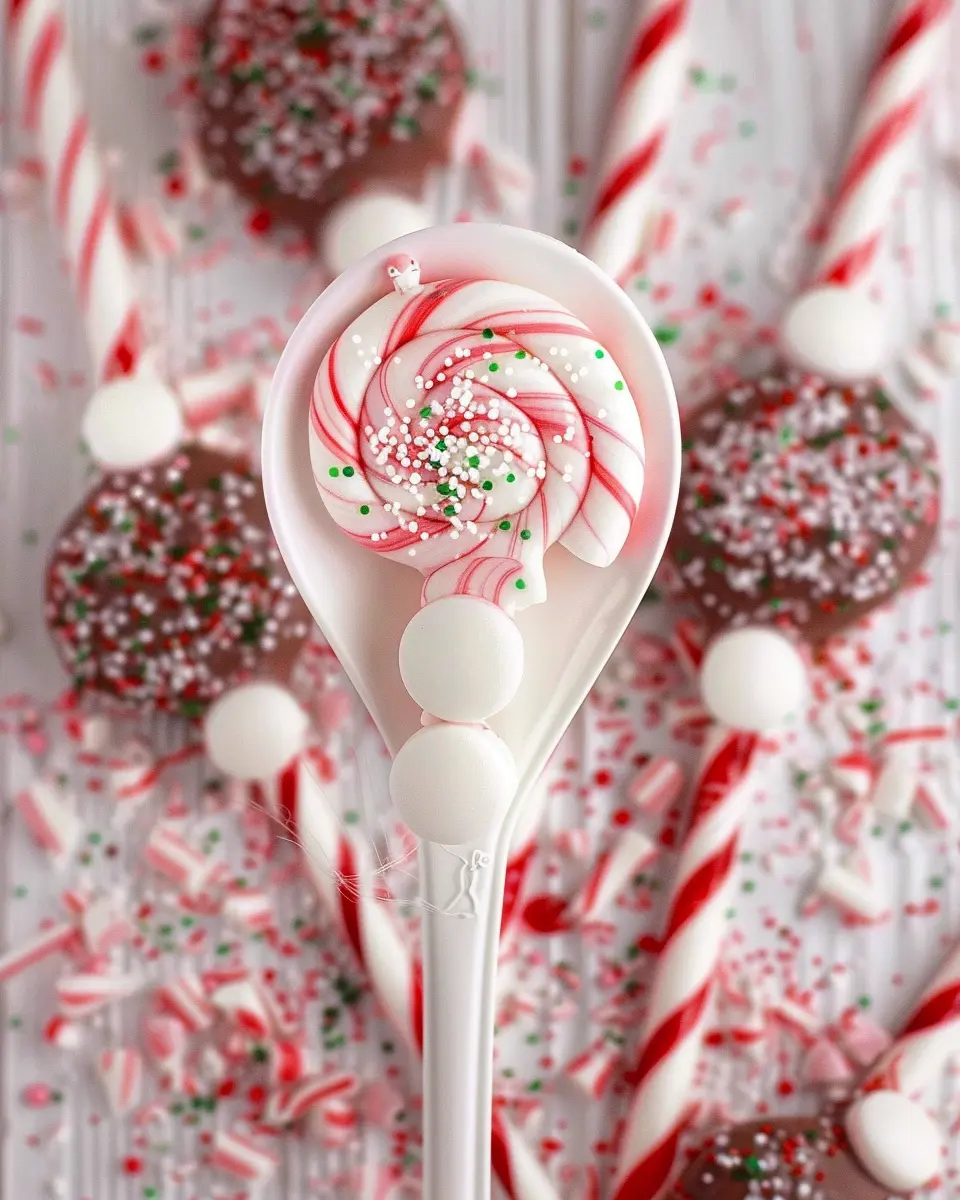
Introduction to DIY Peppermint Candy Spoons
If you’re looking for a fun and festive way to enjoy your favorite hot drinks, look no further than DIY peppermint candy spoons! These whimsical little treats are not only incredibly easy to make but also add a delightful touch to any cocoa or coffee experience. Imagine stirring your warm drink with a spoon that melts deliciously into flavorful peppermint goodness—it’s a delight for the senses!
What are peppermint candy spoons, and why are they a fun treat?
Peppermint candy spoons are exactly what they sound like: sturdy, sweet spoons made from peppermint candies that are designed for stirring into hot beverages. They’re typically made by melting down peppermint candies and molding them into spoon shapes, creating a delightful fusion of flavor and function.
Why should you consider making your own? Here are a few reasons:
- Customization: You can experiment with different flavors by mixing in white chocolate or even adding sprinkles before they cool.
- Great Gift Idea: These homemade goodies make for adorable gifts! Package them up with a nice mug and some hot cocoa mix, and you’ve got a charming present for friends and family.
- Fun Activity: It’s a great DIY project to do solo or with friends. Plus, it’s a fantastic way to spark creativity in the kitchen!
As holiday seasons approach, these DIY peppermint candy spoons can add a festive touch to your gatherings. According to experts at the National Confectioners Association, candy-making at home has seen a resurgence as people look for engaging activities. Not only that, but you can also share them during gatherings, elevating the atmosphere with their colorful presentation and delightful taste.
Before you dive into our step-by-step recipe, consider having some fun flavored hot chocolates or festive coffees (think hazelnut or caramel!) on hand to pair them with.
So grab your baking sheets and let’s get started crafting these delightful treats that promise to sweeten your sipping experience!

Ingredients for DIY Peppermint Candy Spoons
Creating your own DIY peppermint candy spoons is easier than you might think! Here’s what you’ll need to bring these sweet delights to life:
- Peppermint Candy Canes: About 10-15 will do; choose a brand known for its intense flavor, like Starlight or Spangler.
- Chocolate: Use one cup of semi-sweet chocolate chips. You can also consider white chocolate for a fun twist! It melts beautifully and pairs perfectly with the mint.
- Spoon Molds: Silicone molds work best, giving you that adorable spoon shape with ease.
- Optional Toppings: Sprinkles, crushed candy canes, or a drizzle of contrasting chocolate can add an extra layer of flair—who doesn’t love a little visual appeal?
Every ingredient plays a vital role in achieving that perfect combination of crunchy and creamy. Make sure to check out suppliers like Wilton for quality molds and ingredients. You’ll have lovely, personalized spoons ready for hot cocoa or dessert!
If you have a busy schedule, you can whip these up in no time and impress your friends—your taste buds will thank you!
Preparing DIY Peppermint Candy Spoons
Are you ready to add a sweet twist to your hot chocolate or coffee? DIY peppermint candy spoons are the perfect solution! Easy to make and impressive to serve, these delightful spoons can elevate your chilly evenings or festive gatherings. Let’s walk through each step together—grab your supplies and let’s get started!
Step 1: Gather your materials
Before diving into the magic of making your diy peppermint candy spoons, it’s essential to gather everything you need. Here’s what you’ll want on hand:
- Peppermint candies: Use the classic red and white mints for that traditional look and flavor. You can also explore options like candy canes for a fun twist.
- Silicone spoon molds: These will be the shape of your spoons. Silicone works best because it’s flexible, making it easier to pop out the hardened candies later.
- Parchment paper: This will keep your preparation area tidy and help prevent sticking.
- A rolling pin or heavy object: For crushing the candies.
- Oven: You’ll need it to melt the candies to create your spoon shape.
By having everything ready to go, you’ll streamline your process and avoid any last-minute scrambles.
Step 2: Preheat the oven
Get your oven warmed up to 350°F (175°C). This temperature is perfect for melting the candies evenly without burning them. Preheating may seem straightforward, but it can make a significant difference in how your diy peppermint candy spoons turn out.
Step 3: Crush the peppermint candies
Now, the fun (and a little loud) part! Place your peppermint candies in a plastic bag and crush them with your rolling pin or heavy object. You want a mix of fine and chunky pieces to create an appealing texture. The chunks will help form the spoon’s body, while the finer pieces will create a smooth finish when melted.
If you’re looking for an even quicker method, you can use a food processor. Just pulse until you reach your desired texture, but be cautious not to over-process them into powder!
Step 4: Fill the spoon mold
Once your candies are crushed, it’s time to fill the silicone molds. Spoon the crushed candies into each cavity, making sure to pack them down slightly for a sturdy spoon. Leave a bit of space at the top, as the candies will spread out a bit when melted. Feel free to play around with combinations—mixing peppermint with other flavors can add an exciting twist!
Step 5: Melt in the oven
Carefully place your filled molds in the preheated oven. Keep an eye on them; it usually takes about 5-8 minutes for the candies to melt properly. You’re looking for a gooey, melted consistency that still retains some shape. This melting process is where the magic truly happens, transforming hard candies into beautiful, edible spoons!
Step 6: Cool and remove from the mold
Once your spoons have melted to perfection, take them out of the oven and allow them to cool for a few minutes. This step is crucial; rushing to pop them out while they’re still hot might lead to breakage. After they cool (usually 10-15 minutes), gently flex the silicone mold to release the diy peppermint candy spoons. If any bits stick, don’t worry—just use a small knife to help release them.
These festive peppermint spoons can be used immediately in your favorite beverage, or you can package them as cute gifts. They not only taste delicious but also add a gorgeous visual element to your hot beverages. Plus, it’s a fantastic way to impress your friends during cozy gatherings.
By following these steps, you’re well on your way to crafting charming and delicious diy peppermint candy spoons. Happy crafting, and enjoy those sweet moments!
Variations on DIY Peppermint Candy Spoons
There are so many delightful variations to consider when crafting your own DIY peppermint candy spoons. Why settle for just one version when you can create an array of festive flavors and designs?
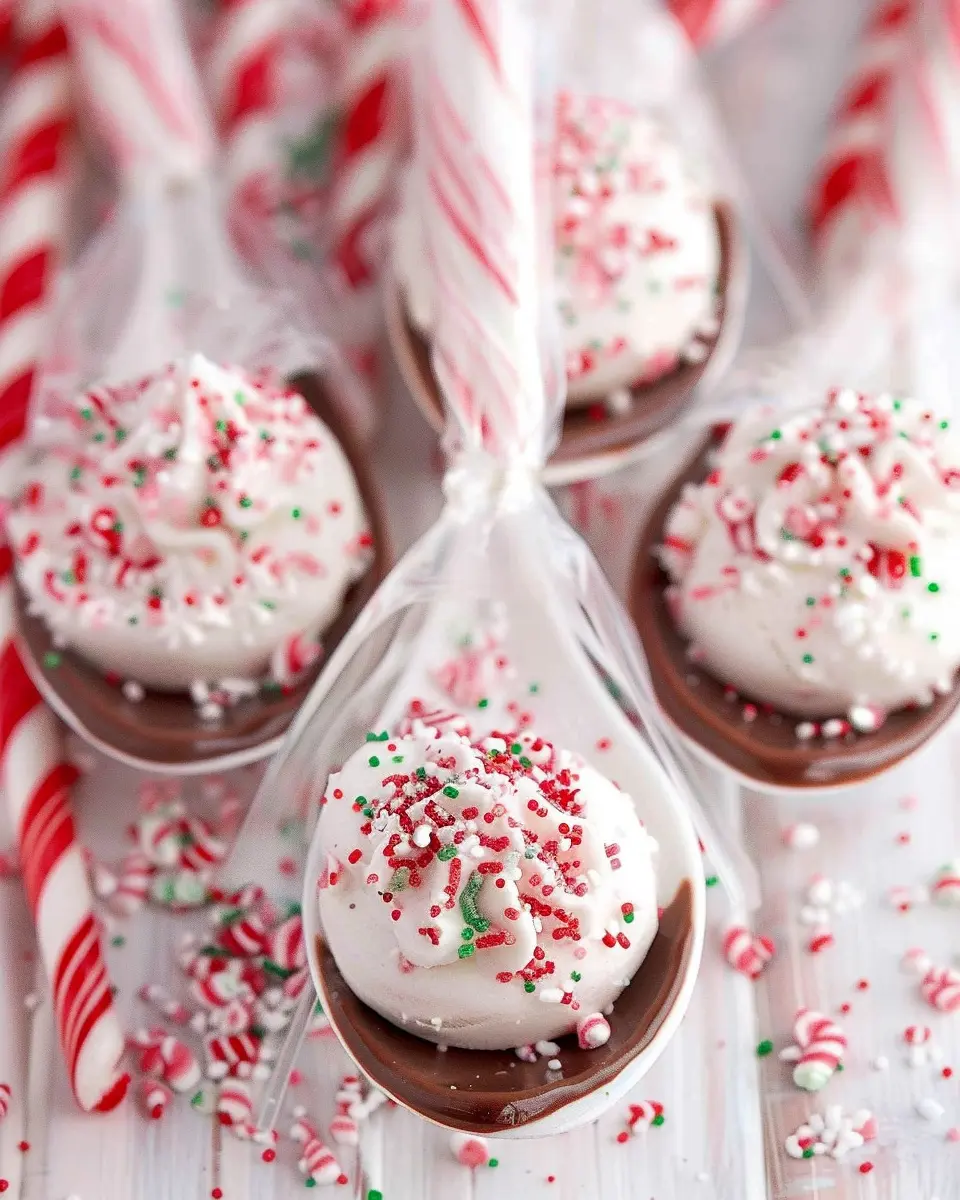
Chocolate-Dipped Peppermint Candy Spoons
One of the most popular twists on standard DIY peppermint candy spoons is the chocolate-dipped variety. Simply melt some high-quality chocolate (dark, milk, or even white) and dip the end of each spoon into the luscious coating. Allow the excess chocolate to drip off before placing the spoons on parchment paper to set.
For an extra touch, consider drizzling more melted chocolate on top once they’re set. Not only do these chocolate-dipped spoons boast a rich flavor, but they also look elegant. You’ll impress anyone who receives them, making them perfect for holiday gift-giving.
Remember to use high-quality ingredients, as this will make all the difference in taste and appeal. According to a Culinary Institute report on chocolate quality, opting for gourmet brands can elevate desserts significantly.
Holiday-Themed Sprinkles Options
Another fun way to personalize your DIY peppermint candy spoons is by adding sprinkles. After dipping your spoons in chocolate, get creative with festive sprinkles!
- Traditional Colors: Think red and green for a classic holiday look.
- Metallics: Gold and silver sprinkles give a touch of elegance to your creations.
- Seasonal Shapes: Consider snowflakes or Christmas trees for extra whimsy.
Not only do these toppings enhance the visual appeal, but they also add a fun crunch that contrasts beautifully with the smooth chocolate. For tips on finding the best sprinkles, check out SprinklePony, which offers a wide variety of festive options!
Creating DIY peppermint candy spoons can be both a delicious and creative endeavor, so mix and match these variations to find your perfect combination!
Cooking Tips and Notes for DIY Peppermint Candy Spoons
Creating your own DIY peppermint candy spoons is not just a fun activity but also an opportunity to impress friends and family with a delightful treat! Here are some practical tips to help ensure your candy-making adventure goes smoothly.
Gather Your Ingredients First
Before diving in, make sure you have all the ingredients ready: peppermint extract, granulated sugar, and any optional flavorings or colorings. Having everything on hand helps streamline the process and makes it more enjoyable.
Know Your Temperatures
Temperature is crucial when melting the sugar. Use a candy thermometer to ensure the sugar reaches the soft crack stage (around 270°F) for the best texture. If you’re new to candy making, you might find resources like The Kitchn helpful for temperature guides.
Flexibility with Shapes and Sizes
Feel free to experiment! Different spoon molds can create unique shapes that add character to your DIY peppermint candy spoons. Plus, who says they all have to be the same size? Mixing it up can add a playful touch.
Storage Matters
Storing your finished spoons in an airtight container prevents moisture, which can ruin their crispiness. Consider placing parchment paper between layers to keep them from sticking together. They make great gifts too—pack them in pretty boxes for a festive presentation!
With these tips, you’re well on your way to making delightful candy spoons that are sure to be a hit! Happy cooking!

Serving Suggestions for DIY Peppermint Candy Spoons
When you whip up a batch of DIY peppermint candy spoons, the fun doesn’t stop at just making them. These delightful treats are incredibly versatile and perfect for various occasions. Here are some suggestions to serve them up delightfully:
-
Hot Beverages: Use your peppermint candy spoons to stir into hot chocolate or coffee for an extra festive touch. The melting candy will add a sweet and minty flavor that’s sure to elevate your drink.
-
Gift Ideas: Consider wrapping a few of these colorful spoons in cellophane tied with a ribbon. They make excellent handmade gifts for friends and family during the holiday season or as a thoughtful token for teacher appreciation.
-
Decorative Touch: Display your spoons in a mason jar as a centerpiece at your next holiday gathering. They not only serve a purpose but also add a festive flair to your table setting.
-
Chocolate Dipping: Get creative and dip your DIY peppermint candy spoons into melted chocolate for an outrageous combination of flavors. This will make them even more enticing and visually appealing!
With these suggestions, your DIY peppermint candy spoons can be more than just a sweet treat; they can be an interactive experience for friends and loved ones, spreading joy and deliciousness! For more inspiration, check out this great resource on holiday treats that will perfectly complement your spoons.
Time Breakdown for DIY Peppermint Candy Spoons
Preparation time
Getting ready to whip up your DIY peppermint candy spoons is a breeze! You’ll need about 10 to 15 minutes to gather your ingredients, line your baking sheets, and crush those peppermint candies. It’s the perfect opportunity to enjoy a little holiday music or catch up on your favorite podcast while you work!
Cooking time
Once everything is in place, you’re looking at a cooking time of around 10 to 12 minutes. That’s just enough time to sip on a hot chocolate while you keep an eye on the oven—your peppermint candy spoons will be ready before you know it.
Total time
All in all, you can expect to spend about 20 to 30 minutes on this delightful project. In no time, you’ll have beautiful, festive candy spoons that are sure to impress your friends and family. For a fully detailed recipe, check out this source, and start making your own sweet treats today!
Nutritional Facts for DIY Peppermint Candy Spoons
Creating your own DIY peppermint candy spoons not only adds a festive touch to your hot chocolate or coffee but also allows you to control the ingredients. Here’s a quick rundown on the nutritional aspects:
Calories
Each peppermint candy spoon contains approximately 50 calories. This makes it an indulgent yet manageable treat to enjoy during the holiday season without the guilt.
Sugar Content
These delightful spoons pack around 12 grams of sugar. While it’s sweet enough to satisfy cravings, remember moderation is key, especially if you’re mindful of daily sugar intake. The American Heart Association recommends limiting added sugars to 6 teaspoons for women and 9 teaspoons for men daily.
Serving Size
Typically, one spoon acts as a serving size. Depending on your taste preference, you might even find half a spoon is enough to impart flavor into your drink.
For even more insights on sugar and health, check out research from Harvard Health on sugar consumption guidelines. Enjoy your peppermint creations, and remember, while they are a delightful addition to your drinks, balance is essential!
FAQs about DIY Peppermint Candy Spoons
Creating DIY peppermint candy spoons can be a fun project, but you may have some questions. Here, we’ve compiled the most frequently asked questions to help you succeed in your candy-making adventure.
Can I use other types of candy?
Absolutely! While the classic peppermint flavor is delightful, you can get creative. Feel free to try other hard candies like crushed butterscotch, cinnamon, or even chocolate squares. Just keep in mind that different candies may require slight adjustments in temperature to melt properly and will alter the flavor profile of your spoons.
How long do the spoons last?
When properly made and stored, DIY peppermint candy spoons can last up to two weeks. However, if you want to keep them a tad longer, just be mindful of humidity, as it can make them sticky. Use a clean, dry environment to maximize their shelf life.
How do I store leftover peppermint candy spoons?
To ensure the longevity of your peppermint creations, store your candy spoons in an airtight container at room temperature. A cool, dry place is ideal to maintain their texture and flavor. If you live in a particularly humid area, consider adding a silica gel pack to absorb moisture—this little trick can make a big difference.
For more tips on candy storage and preservation, check out resources like Food Safety.gov. Making your own DIY peppermint candy spoons adds a cozy, personal touch to your hot drinks, making those chilly evenings feel extra special. Happy crafting!
Conclusion on DIY Peppermint Candy Spoons
In conclusion, making DIY peppermint candy spoons is a delightful way to add a festive touch to your holiday gatherings or cozy winter evenings. Not only are they fun to create, but they also make fantastic gifts for friends and family. Picture those warm cups of hot chocolate, each adorned with a peppermint spoon, stirring up memories of laughter and joy.
To recap, you’ll need simple ingredients, some creativity, and a bit of patience. If you’re looking for inspiration or variations, check out this guide on creative gift ideas with chocolate from The Spruce Eats. So why not give it a try? Dive into the sweet world of DIY peppermint candy spoons and warm up your winter!
PrintDIY Peppermint Candy Spoons: Easy Festive Treats for Everyone

Learn how to make delightful DIY peppermint candy spoons that are perfect for any festive gathering.
- Prep Time: 10 minutes
- Cook Time: 10 minutes
- Total Time: 20 minutes
- Yield: 12 spoons
- Category: Desserts
- Method: Baking
- Cuisine: American
- Diet: Vegetarian
Ingredients
- 1 cup crushed peppermint candies
- 1 cup chocolate chips
- 1 tablespoon vegetable oil
- 12 wooden spoons
Instructions
- Preheat the oven to 350°F (175°C).
- Spread the crushed peppermint candies on a baking sheet lined with parchment paper.
- Bake for 5-8 minutes until melted.
- Remove from the oven and quickly press the wooden spoons into the melted peppermint.
- Let them cool completely before using.
Notes
- The spoons can be stored in an airtight container for up to two weeks.
- Make sure to let the melted candy cool completely before packaging.
Nutrition
- Serving Size: 1 spoon
- Calories: 150
- Sugar: 12g
- Sodium: 20mg
- Fat: 9g
- Saturated Fat: 5g
- Unsaturated Fat: 4g
- Trans Fat: 0g
- Carbohydrates: 18g
- Fiber: 0g
- Protein: 2g
- Cholesterol: 0mg