Introduction to Burnt Basque Cheesecake
What is Burnt Basque Cheesecake?
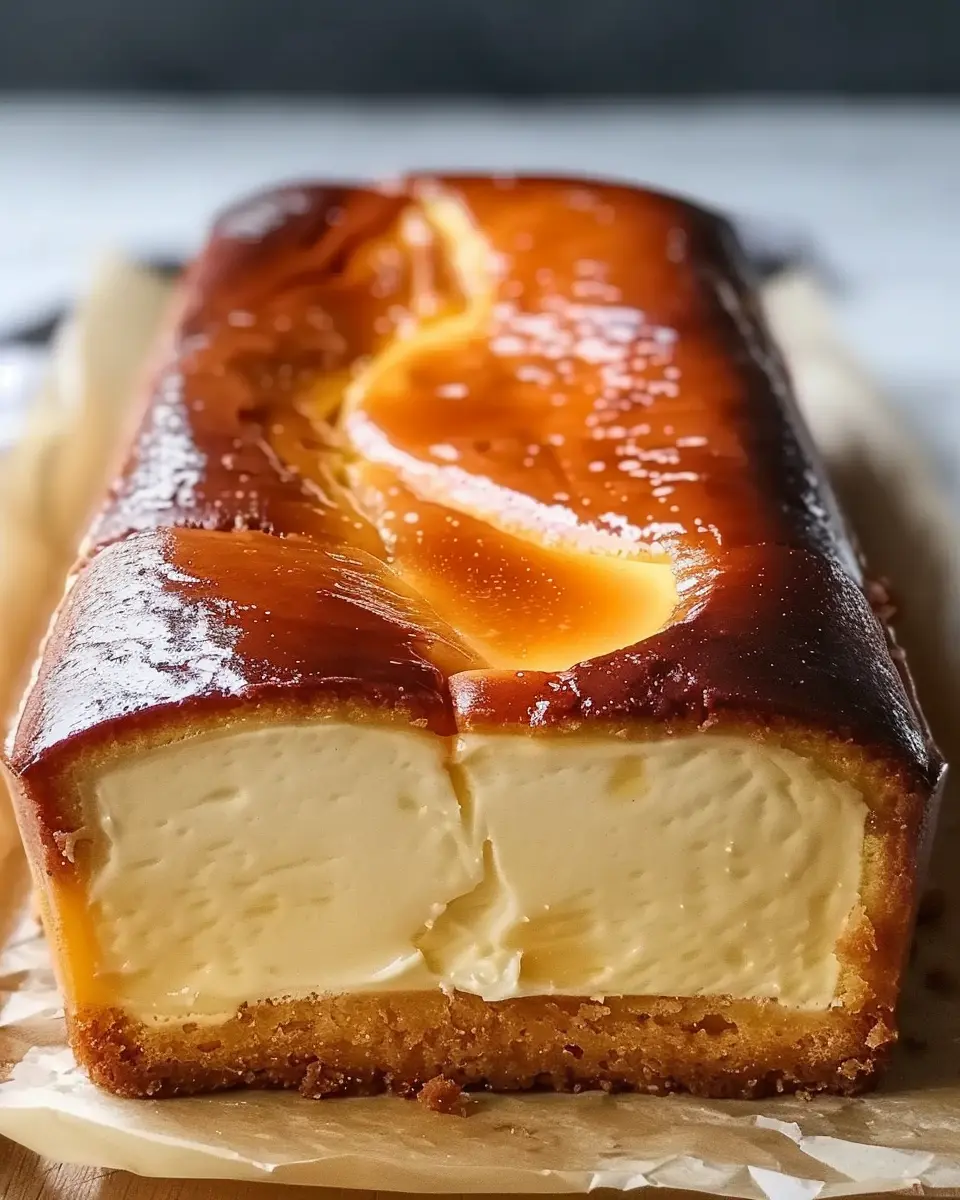
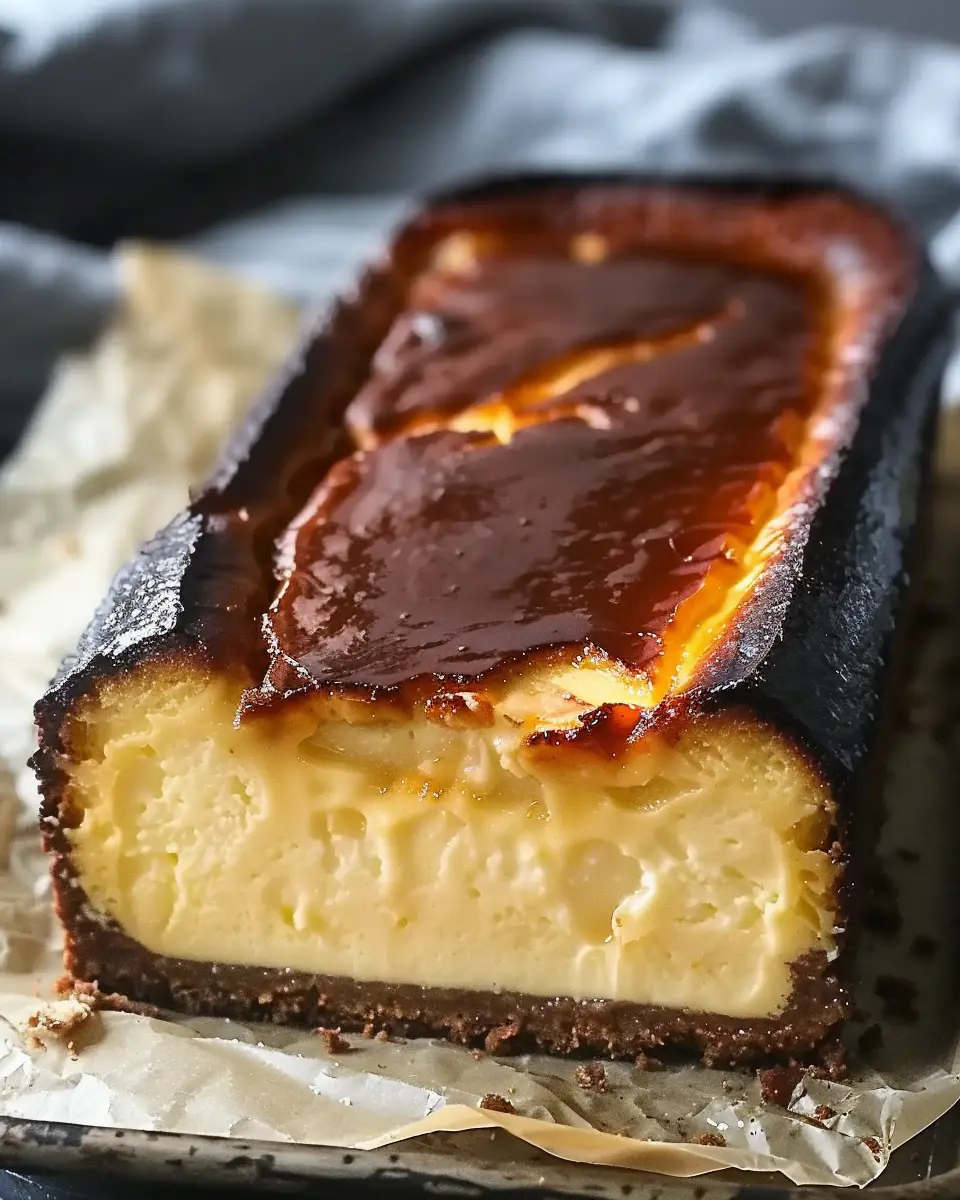
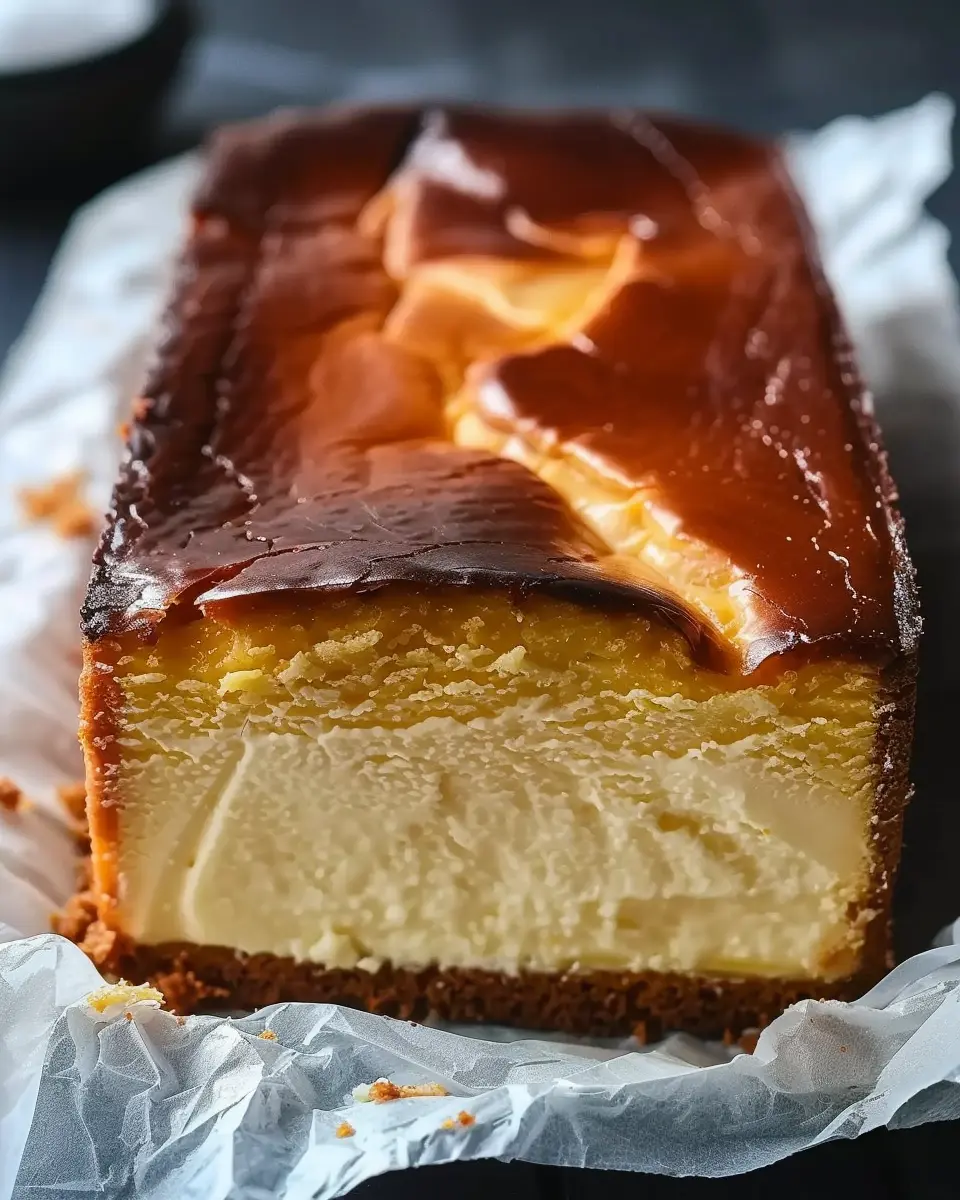
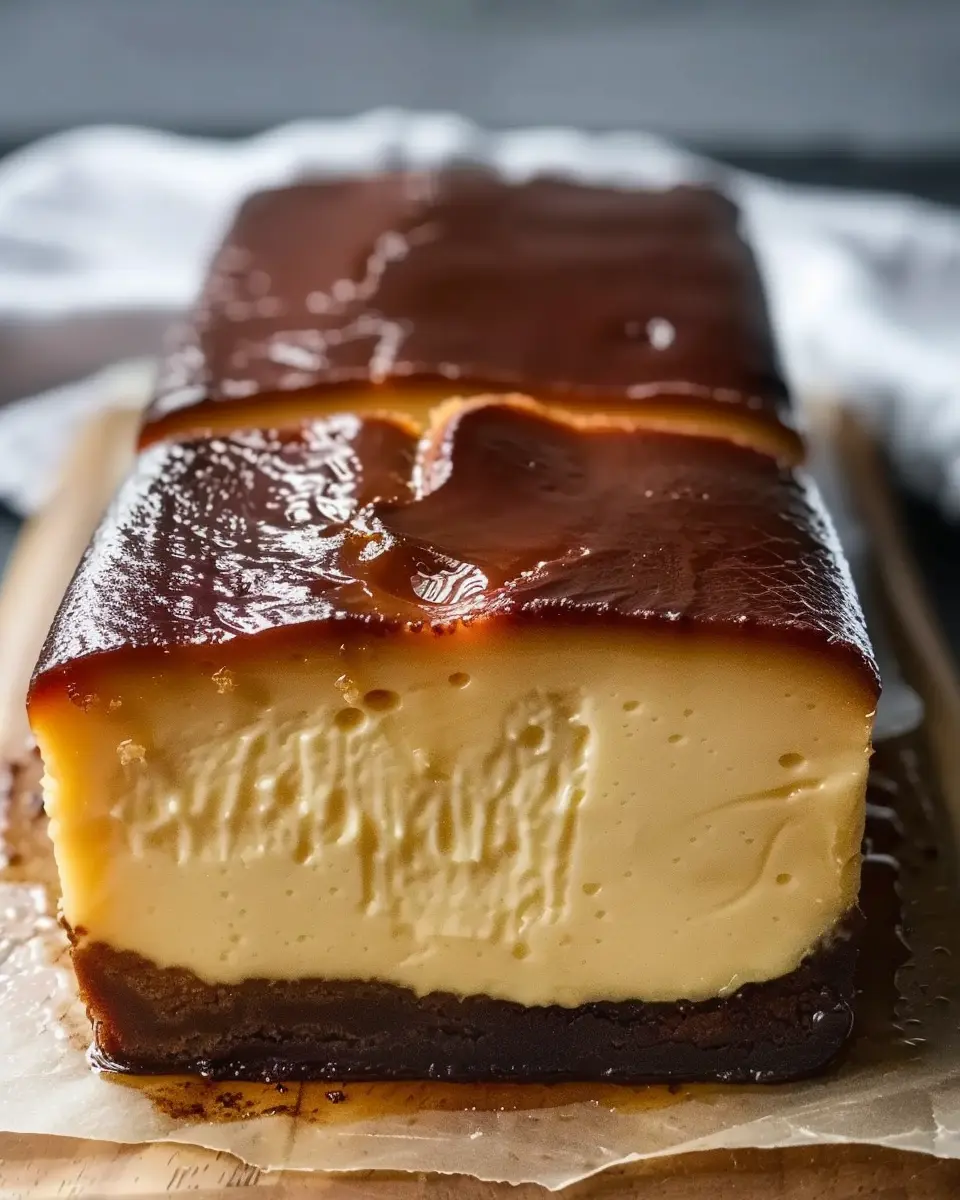
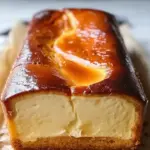
If you’re a cheesecake aficionado, you might already have a penchant for the creamy richness of cheesecake. However, allow me to introduce you to the delightful twist that is burnt Basque cheesecake. Originating from the Basque region of Spain, this cheesecake stands out with its unique preparation method that creates a charred exterior while maintaining a luxuriously creamy center. Imagine a dessert that combines boldness with a melt-in-your-mouth texture—it’s truly a treat for the senses!
This cheesecake typically features simple ingredients like cream cheese, sugar, eggs, and heavy cream, but it’s the technique that takes it over the top. Unlike the traditional cheesecake that is meticulously baked to golden perfection, the burnt Basque cheesecake seeks a little chaos to create a delightfully imperfect exterior. The result? An eye-catching dessert that is as delicious as it is visually appealing. For a deep dive into the origins of this tempting dessert, check out Le Chef.
Why is it gaining popularity?
The rise of burnt Basque cheesecake in culinary circles can be attributed to a few factors. Firstly, its eye-catching appearance makes it a social media darling. Who wouldn’t want to show off a dessert that looks deliciously rustic? Instagram and TikTok are flooded with variations that highlight this cheesecake’s unique look, which piques the interest of dessert lovers around the globe.
Moreover, a recent surge in home baking—especially during lockdowns—has led many food enthusiasts to explore this easy yet stunning dessert. According to a survey by the NPD Group, more people began baking at home, with 66% of respondents saying they found it enjoyable. The simplicity and accessibility of burnt Basque cheesecake make it an ideal choice for both seasoned bakers and novices. Plus, it’s hard to resist a dessert that requires so little fuss yet delivers on flavor and aesthetic appeal.
So, whether you’re preparing for a dinner party or just treating yourself after a long day, this is one dessert that deserves a spot in your recipe book. Dive into our Burnt Basque Cheesecake in a Loaf Pan recipe and experience the magic for yourself!
Ingredients for Burnt Basque Cheesecake
Making a delightful burnt Basque cheesecake in a loaf pan requires a few essential ingredients that come together to create a rich and creamy dessert. Here’s what you’ll need to gather:
Essential ingredients
- Cream cheese (16 oz) – The star of the show! Make sure it’s at room temperature for easy mixing.
- Granulated sugar (1 cup) – This adds the sweetness we crave.
- Eggs (3 large) – These provide structure and a creamy texture.
- Heavy cream (1 cup) – For that luxurious creaminess, don’t skimp on this!
- Vanilla extract (1 teaspoon) – A touch of flavor that enhances the cheesecake experience.
- All-purpose flour (1 tablespoon) – Just a little bit to help with the structure.
Optional additions
Feel free to get creative! Here are some optional ingredients that can enhance your burnt Basque cheesecake:
- Citrus zest (like lemon or orange) – A refreshing twist that cuts through the richness.
- Salt (a pinch) – To balance the sweetness.
- Crushed cookies (for the base) – Add a crunchy layer for texture.
With these ingredients, you’re on your way to creating a decadent dessert that’s sure to impress. If you’re curious about how cream cheese can impact your baking, check out this guide for more insights! Enjoy your cheesecake adventure!
Preparing Burnt Basque Cheesecake
Creating a burnt basque cheesecake is an art form — one that many have tried to master but very few can pull off perfectly. This delightful treat is known for its rich flavors and almost caramelized top, inviting you in for a bite. The process, however, is simple and fun! Let’s walk through each step.
Preheat your oven and prepare the loaf pan
First things first: Get that oven preheating to a confident 400°F (200°C). A properly heated oven is crucial for achieving the signature cracked top and creamy center that makes burnt basque cheesecake so irresistible.
While your oven gets nice and toasty, it’s time to prepare your loaf pan. Line it with parchment paper, making sure to leave some overhang. This little trick acts as a handle when it’s time to lift out your cheesecake. Ensure that the parchment fits snugly against the pan, as any gaps might affect the baking process. For a definitive guide on lining pans effectively, check out this helpful resource.
Create the cheesecake batter
Now, let’s whip up that luscious cheesecake batter that will bring your creation to life. In a large mixing bowl, combine the following ingredients:
- 2 cups cream cheese, softened
- 1 cup sugar
- 3 large eggs
- 1 cup heavy cream
- 1 teaspoon vanilla extract
- A pinch of salt
Using a hand mixer or stand mixer, beat these ingredients on medium speed until completely smooth and creamy. You want to avoid overmixing, as that could introduce unwanted air bubbles. Remember, the goal is a thick and decadent batter.
Pro tip: Make sure your cream cheese is at room temperature to avoid lumps. If you’re pressed for time, you can microwave the cream cheese in short bursts, watching it closely, to soften it up.
Bake the cheesecake to perfection
With your batter ready, pour it into the lined loaf pan. Smooth the top with a spatula for an even bake. Place the pan in your preheated oven and set a timer for 25 to 30 minutes. Keep a close eye on it, as the outer edges should be set while the center remains a little jiggly. This ensures a wonderfully creamy texture.
You’ll know it’s done when the top has that delightful burnt appearance, looking almost like a golden brown crust. If you take it out and it’s a little puffed up, don’t worry; it will settle as it cools.
Cooling and chilling your cheesecake
After baking, let your cheesecake cool in the pan for about 30 minutes. This step is essential for locking in moisture and biting into a velvety slice full of flavor. Once it has cooled a bit, carefully lift it out using the parchment overhang and allow it to cool completely on a wire rack.
Once cooled to room temperature, store it in the fridge for at least 4 hours or even overnight. Chilling enhances the flavors and improves the overall texture of your burnt basque cheesecake.
Slicing and serving the cheesecake
After the glorious waiting period, it’s time for the moment of truth: slicing and serving! Use a sharp knife warmed in hot water to achieve clean cuts. Serve it simply, or add fresh berries or a drizzle of caramel sauce to elevate the dish. Trust us, it looks as good as it tastes!
Got leftovers? The burnt basque cheesecake stores beautifully in the fridge for up to 5 days, making it an ideal make-ahead dessert for gatherings.
Now, if you didn’t already, don your chef hat and dive into this decandent adventure with not just the recipe but also your taste buds ready! You’re sure to impress anyone fortunate enough to taste your creation! Happy baking!
Variations on Burnt Basque Cheesecake
Adding flavors: citrus and spice
If you want to elevate your burnt Basque cheesecake experience, consider adding some tantalizing flavors. Citrus zest, like lemon or orange, brings a refreshing brightness that cuts through the richness of the cheesecake. Simply add a tablespoon of freshly grated zest into your batter for a delightful twist.
Spices can add warmth and depth, too! Cinnamon or nutmeg can transform your cheesecake into a festive treat. Try incorporating half a teaspoon of ground spice into your cream cheese mixture to enchant your guests with subtle notes that make them wonder what that hint of flavor is. If you’re feeling adventurous, consider mixing in a dash of cardamom for a unique spin.
Gluten-free options for the cheesecake
For those avoiding gluten, you can effortlessly adapt your burnt Basque cheesecake. Luckily, this recipe is naturally gluten-free because it typically doesn’t require any flour. However, it’s crucial to check the labels on your cream cheese and any other ingredients to ensure they are gluten-free certified.
For a crunchier crust, you might also experiment with gluten-free cookie crumbs made from almond flour or even crushed gluten-free graham crackers. This can help create a tasty base without the worry of gluten.
Experiment and Enjoy
Remember, the beauty of this cheesecake lies in its adaptability. Don’t hesitate to play around with flavors and textures that suit your palate. Whether you choose to blend in some spices or try a gluten-free alternative, the possibilities are endless. For more ideas, check out this article on flavor pairings that can inspire your baking journey! Happy cheesecake making!
Baking notes for Burnt Basque Cheesecake
Common mistakes to avoid
Crafting the perfect burnt basque cheesecake can be a fun adventure, but there are a few common pitfalls you’ll want to sidestep.
- Baking at the wrong temperature: Ensure your oven is preheated to a consistent temperature. An oven thermometer can be your best friend here.
- Overmixing the batter: This can lead to a denser texture; mix just until combined.
- Choosing the wrong pan: A loaf pan is ideal for this recipe, but avoid using non-stick pans that can affect the caramelization of the batter.
Tips for achieving the perfect burnt top
The signature burnt top of a burnt basque cheesecake is where the magic happens! Here are pro tips to nail it:
- Don’t skimp on the bake time: Aim for a little char; it enhances the flavor and appearance.
- Use a broiler at the end: For a more pronounced burn, pop the cheesecake under the broiler for a few minutes, just watch it closely!
- Cool it properly: Let it cool at room temperature before refrigerating, which helps in setting that creamy inside.
For more insights, check out BBC Good Food or Serious Eats. Your burnt basque cheesecake success starts here!
Serving suggestions for Burnt Basque Cheesecake
When it comes to enjoying your burnt basque cheesecake, pairing it with the right beverages can elevate the experience. Consider refreshing options like herbal teas or a rich, creamy cold brew coffee. A delightful iced matcha latte can also complement the cheesecake’s rich texture.
Creative plating ideas
Plating isn’t just about looks—it’s a way to make your burnt basque cheesecake experience even more special. Serve slices on rustic wooden boards for a warm, homey feel, or dust with cocoa powder and garnish with fresh berries and mint for a pop of color. Small mason jars filled with a berry compote can make for an elegant addition on the side.
Feeling adventurous? Add a drizzle of caramel or a sprinkle of sea salt atop each slice to contrast the creamy cheesecake flavor. You could even serve it with a scoop of vanilla bean ice cream for that indulgent touch.
These toppings and presentation tips will impress your guests while allowing the flavors of the burnt basque cheesecake to shine. For more serving ideas, check out resources from Food52 or Bon Appétit.
Tips for making the perfect Burnt Basque Cheesecake
Pro tips from experienced bakers
Creating the ideal burnt basque cheesecake is all about technique and attention to detail. First, ensure your cream cheese is at room temperature; this helps achieve that smooth, creamy texture we all love. Mixing should be done gently—avoid overmixing to keep your cheesecake airy. If your batter feels thick, a splash of milk can help adjust the consistency.
When you’re baking, use parchment paper to prevent sticking and maintain that rustic look. A loaf pan offers a wonderful slice-and-serve option, too! Make sure to bake in the center of your oven for even heat distribution, and don’t be alarmed by the dark top—it’s meant to be “burnt” for that rich flavor.
Want to explore some tried-and-true tips? Check sites like Serious Eats or Bon Appétit for expert insights!
Swapping ingredients for best results
Don’t hesitate to experiment with ingredients in your burnt basque cheesecake! Instead of heavy cream, you can use sour cream for a tangy twist. If you’re dairy-free, try coconut cream for a unique flavor profile. When it comes to sugar, brown sugar can add an extra depth of flavor, enhancing that caramelized top.
Why not top your masterpiece with fresh berries or a citrusy fruit compote? This not only looks appealing but also balances the richness of the cheesecake. For more creative swaps and variations, check out The Kitchn for inspiration!
These tips can help elevate your baking game and ensure you create the burnt basque cheesecake of your dreams. Happy baking!
Time details for Burnt Basque Cheesecake
Preparation time
Getting started on your burnt basque cheesecake is quick and straightforward. You’ll need around 15 minutes to gather your ingredients, preheat the oven, and mix everything together. It’s almost like a warm-up for the deliciousness to come.
Baking time
The real magic happens in the oven! Bake your cheesecake for approximately 40-45 minutes. You want that perfect golden-brown top, which is what makes this dessert so distinctive. Keep an eye on it to avoid over-browning.
Total time
All in all, you’ll spend about an hour on this delectable dessert from start to finish. Once it’s out of the oven, let it cool to room temperature before indulging. For more tips on cooling times, you can check out resources like The Kitchn. Enjoy your cheesecake journey!
Nutritional Information for Burnt Basque Cheesecake
When indulging in the creamy delight of burnt basque cheesecake, knowing its nutritional profile can help you enjoy every bite guilt-free. Here’s a quick breakdown:
Calories
This decadent dessert typically packs around 300 calories per slice. It’s a sweet indulgence, so savor it in moderation!
Protein
You’ll find approximately 7 grams of protein in each slice, thanks to the rich cream cheese and eggs. It contributes to making this cheesecake both satisfying and delightful.
Carbohydrates
Each slice contains about 20 grams of carbohydrates. This includes some natural sugars, allowing for that creamy, luscious texture that makes burnt basque cheesecake so irresistible.
For more on nutritional insights for desserts, check out resources like MyFitnessPal or the USDA’s FoodData Central for detailed breakdowns. Balancing your treats with nutritious meals throughout the day can lead to both enjoyment and a healthier lifestyle!
FAQs about Burnt Basque Cheesecake
Can I use low-fat cream cheese?
Absolutely! However, using low-fat cream cheese in your burnt basque cheesecake may slightly alter the texture and flavor. Full-fat cream cheese provides that rich creaminess and depth that makes this dessert so indulgent. If you prefer a lighter version, consider mixing low-fat cream cheese with a bit of Greek yogurt for a nice balance of taste and creaminess. Just remember, this will affect the final outcome, so prepare for some experimentation!
What if I don’t have a loaf pan?
No loaf pan? No problem! You can still enjoy this delightful dessert. Here are a few alternatives:
- Round Cake Pan: Just adjust the cooking time to ensure it sets properly, and keep an eye on that gorgeous burnt top!
- Square Baking Dish: An 8×8 dish works wonders too if you want bite-sized servings.
- Muffin Tins: For individual servings, use a muffin tin lined with cupcake liners. Perfect for sharing or portion control!
The key is to make sure your chosen vessel is around the same depth as a loaf pan to achieve that signature creamy center.
How do I store leftovers?
If you’re lucky enough to have leftovers of your burnt basque cheesecake, store it in the refrigerator! Wrap it tightly with plastic wrap or transfer it to an airtight container. It’ll stay fresh for about 3 to 4 days. Just remember, the flavors tend to deepen over time, making every bite a little more delightful! For longer storage, you can freeze it—just slice it beforehand for easy serving later.
For more storage tips, check out resources like The Kitchn to help your baking adventures!
Conclusion on Burnt Basque Cheesecake
Why You Should Give This Dessert a Try
If you’re on the hunt for a unique yet rewarding dessert, the burnt basque cheesecake is a game-changer. This decadent treat will impress your friends and absolutely delight your taste buds. Its creamy texture contrasts beautifully with that perfectly charred exterior, creating a dish that’s as beautiful as it is delicious.
Plus, making it in a loaf pan simplifies the process and enhances that gorgeous presentation. Don’t underestimate the joy of indulging in a dessert that balances flavors so elegantly. Consider pairing your cheesecake with a delightful cup of coffee or a refreshing berry compote for an elevated experience. Ready to bake? You won’t regret this delicious adventure in your kitchen!
PrintBurnt Basque Cheesecake in a Loaf Pan: Easy Indulgence at Home
This Burnt Basque Cheesecake in a Loaf Pan is a deliciously easy recipe for indulgent dessert lovers.
- Prep Time: 15 minutes
- Cook Time: 35 minutes
- Total Time: 50 minutes
- Yield: 8 servings
- Category: Dessert
- Method: Baking
- Cuisine: Spanish
- Diet: Vegetarian
Ingredients
- 8 ounces cream cheese
- 1 cup granulated sugar
- 2 large eggs
- 1 teaspoon vanilla extract
- 1 cup heavy cream
- 1/3 cup all-purpose flour
Instructions
- Preheat the oven to 400°F (200°C).
- In a mixing bowl, beat the cream cheese and sugar until smooth.
- Add the eggs one at a time, then mix in the vanilla extract.
- Slowly incorporate the heavy cream, followed by the flour, until combined.
- Pour the batter into a lined loaf pan.
- Bake for 30-35 minutes until the top is deeply browned.
- Allow to cool before removing from the pan.
Notes
- Allow the cheesecake to chill in the refrigerator for a few hours for best texture.
Nutrition
- Serving Size: 1 slice
- Calories: 320
- Sugar: 20g
- Sodium: 150mg
- Fat: 25g
- Saturated Fat: 15g
- Unsaturated Fat: 5g
- Trans Fat: 0g
- Carbohydrates: 25g
- Fiber: 0g
- Protein: 5g
- Cholesterol: 90mg